

How To Hide Object Till Triggered By Animation In Indesign
Condign a Digital Publishing Master with in5
A free online class to help you lot design interactive projects with InDesign & without coding
Lesson 7: Making Things Move with Blitheness
Few things catch a viewer's middle like blitheness. This lesson volition show you how to create InDesign animations in no time.
Expert Contributors to this lesson
Estimated time for lesson
Today'due south lesson should have approximately 20 minutes.
Today's Course Outline
- Creating Animations from Presets
- Customizing Animations
- Creating Sequences of Multiple Animations
- Triggering Animations with Buttons
- Avant-garde Animation Tips
Creating Animations from Presets
InDesign is a powerhouse when it comes to rapidly producing animations. The undercover behind InDesign's ability to help y'all quickly create animations are the Motion Presets available in the Blitheness panel.
The Animation panel is found under Window > Interactive > Animation.
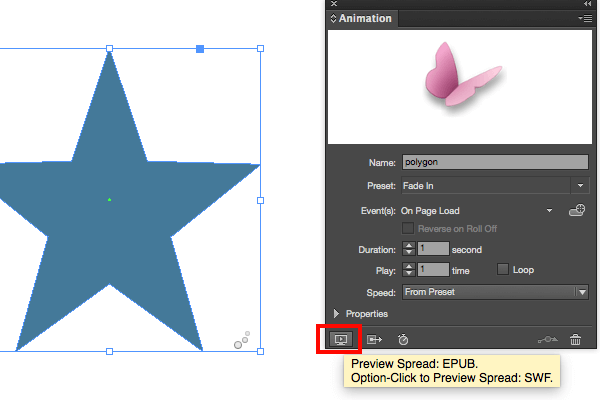
Let'south outset by selecting some artwork. In this case, I've created a star using the polygon tool.
With the artwork selected, cull Fade In from the Preset bill of fare in the Animation panel.
The Blitheness window now shows a sample preview of the animation and the artwork has an icon in the lower right-mitt corner to indicate that an animation has been applied.
You now have a working animation! Let's see how it looks.
Previewing the Blitheness
Y'all can preview the animation by selecting the icon in the lower left-hand corner of the Animation panel. This volition preview the blitheness in the EPUB Interactivity Preview. I'll merely refer to it as the Preview panel.
You lot should see the preview play immediately.
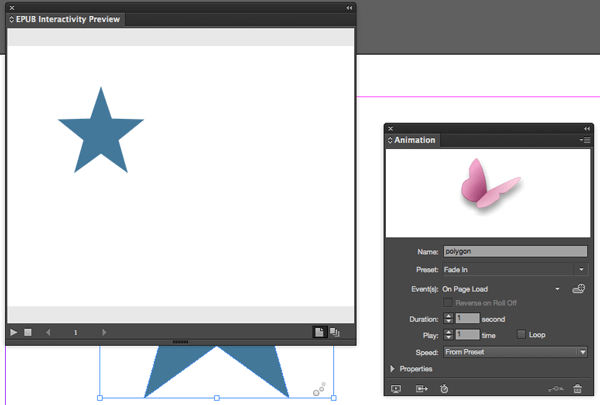
Yous can besides click the play button in the Preview console to reload the animation.
Motion your readers (in no time) using InDesign'southward Animation panel
Customizing Animations
In add-on to creating a pre-built animation in no fourth dimension, you tin can as well take a few seconds and easily customize your animation.
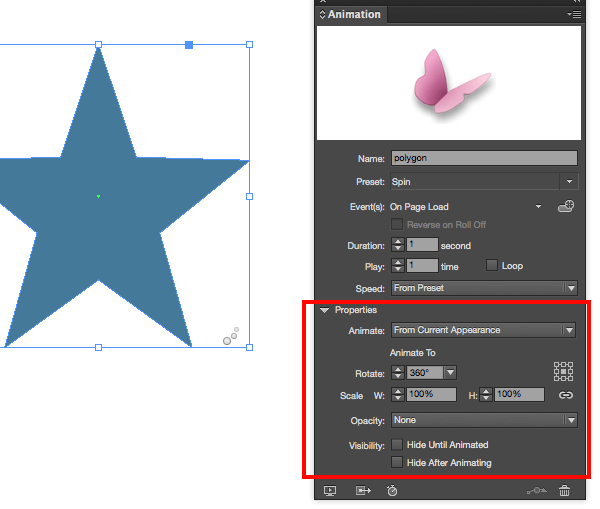
Start by expanding the Properties section of the Animation console to see more options.
I'll get-go alter the Preset to Spin, which will cause the star to spin 360 degrees (one full turn) on its center.
Then I'll make the animation faster by irresolute the duration from ane second to .5 seconds.
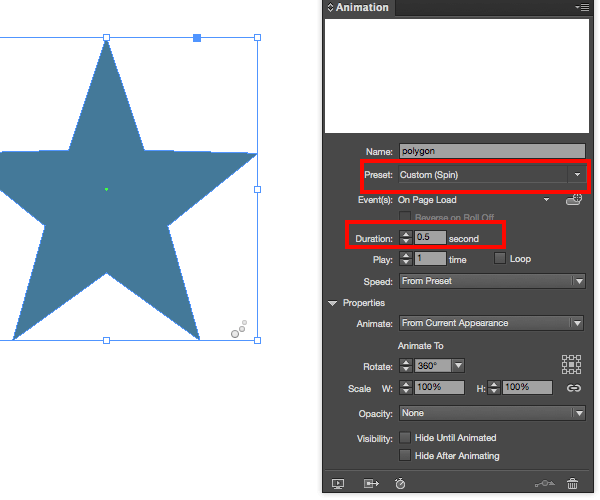
(Annotation that the Preset proper noun changes to Custom when you make adjustments).
Next, I'm going to opt-drag (or alt-drag on Windows) to create a duplicate animation.
On the duplicate star, I'm going to change the Origin Betoken to the top center.
Let'southward preview the difference between the two animations.
In addition to editing the elapsing and the Origin Signal for rotation and scaling, you lot can also modify the post-obit animation properties
- Play/Loop - the number of times that an blitheness is played (past default each animation plays once).
- Speed - the rate of the blitheness (i.e., whether information technology plays evenly, faster at the commencement, faster at the terminate, or faster in the middle).
- Animate - whether the animation moves toward or away from its current appearance in InDesign.
- Rotate - number of degrees of rotation.
- Scale - the size of the object equally it animates.
- Opacity - fade in, fade out.
- Hide Until Animated - keep the object invisible until the animation is triggered.
- Hibernate After Animated - make the object invisible afterwards the animation is complete.
Creating Sequences of Multiple Animations
Without fifty-fifty realizing it, we've merely created a sequenced animation, pregnant that nosotros have multiple animated objects that play in a sequence.
Beginning the center-rotating star animates, so the peak-rotating star animates.
To edit the society of the animations, open the Timing panel (Window > Interactive > Timing).
To re-lodge the blithe objects, simplying elevate them to different locations in the Timing panel.
To take any of the blithe objects play simultaneously, select them in the listing (by shift-clicking) and choose the Play Together option at the bottom of the Timing Panel.
Linked items take a visible bar group them in the Timing panel.
Items can be ungrouped by selecting the Play Separately button.

By default, the sequence we've created is triggered On Page Load. Even so, there are other events that tin trigger an animation.
Triggering Animations with Buttons
In improver to triggering an blitheness On Folio Load, with a single pick you tin too trigger an animation in the following means.
- On Page Click - animation plays when the page is clicked.
- On Click (Self) - animation plays when the object is clicked or tapped.
- On Rollover (Self) - animation plays when the mouse cursor rolls over it.
(You can select multiple Events to play your blitheness, due east.g., both On Page Load and On Click).
Each of these options lets you trigger an animation without creating a divide push. However, you can also create a split button and here are some reasons that you might want to
- Y'all want the user to tap in a location other than where the animation plays.
- The animated object starts out subconscious.
- You lot want deportment other than Play.
- Y'all want additional Events to burn along with triggering the blitheness.
- You want to make information technology articulate to the user that there is something available to play.
The commencement step is to create a push button (run across the button lesson for steps on creating a push).
In that location are and then two ways to connect your animation to the button.
Method ane - From the Animation Panel
- With the blithe object selected, click the Create button trigger push button in the Animation panel.
- And so click on the button object that you want to play the animation.
An blitheness Play event (pointing to the animated object—the star in this case) is then automatically added to the button (see the paradigm below).
Creating the event from the Animation panel saves you from from having to take any steps in the Buttons and Forms panel.
Now if y'all don't want that original On Folio Event anymore, reselect the animated object and uncheck that event.
For the alive example below, I've left the On Folio Event and the button acts as a "replay."
Method 2 - From the Buttons and Forms Panel
- With the push button selected, in the Buttons and Forms panel, click the plus sign (+) to add an Action.
- And choose Animation.
- If there are multiple animated objects on the page, brand sure y'all select the right one from the Animation menu that appears in the Buttons and Forms panel.
(This is tricky if your objects have the same name, then you lot may want to give them unique names to make it easier on yourself).
Now if y'all don't want that original On Page Event anymore, reselect the animated object and uncheck that issue.
In addition to playing animations, the Options carte du jour in the Buttons and Forms panel besides lets y'all exercise the post-obit things to animations
- Stop - halts and sets the blitheness to its ending state.
- Pause - halts the animation and leaves it in place.
- Resume - plays the animation from where information technology is (instead of its starting point).
- Reverse - plays the animation backwards.
- Stop All - stops all animations on the page if there are more than i.
Here's a live demo exported from in5 that lets you lot examination all of the animation actions.
For more on creating animations, check out the Creating Your First Interactive Document video grade.
Advanced Animation Tips
Hopefully this lesson helps y'all get started with animations in InDesign. In one case y'all're comfortable with creating animations, there's so much you tin do.
Here are some advanced tips to help y'all along the way.
- You can animate groups, and simultaneously animate items inside of the group. Picture a swinging pocket spotter (the group) with spinning clock hands (within the group).
- When an blithe object is inside of a Multi-State Object, the On Page Load becomes an On State Load event which lets yous trigger animations when a new land is shown.
- Yous can animate buttons and retain their interactivity.
Take Aways
- Animation helps grab the reader's middle.
- Animations tin be created in seconds.
- The Blitheness and Timing panels let you fine tune your animations.
- Animations tin be triggered past several actions, including button clicks.

Source: https://ajarproductions.com/in5course/?lesson=animation
Posted by: mcelroywitaysen.blogspot.com
0 Response to "How To Hide Object Till Triggered By Animation In Indesign"
Post a Comment